Setting up a Cronus Zen takes about 10 minutes. This guide covers every step – firmware update, Zen Studio install, PS5 bypass methods (all five), Xbox and PC configuration, and loading scripts via GamePacks, GPC files, or ZenBridge – with all controller types including DualSense Edge.
What you'll need
Before starting, have the following ready:
- Cronus Zen device
- PC: Windows 10/11 – or Mac Apple Silicon via Parallels, or Mac Intel via Boot Camp
- Besavior P5Mate Pro, Cronus Zen LINK etc. (optional add-on for native PS5 support)
- Google Chrome or Microsoft Edge browser
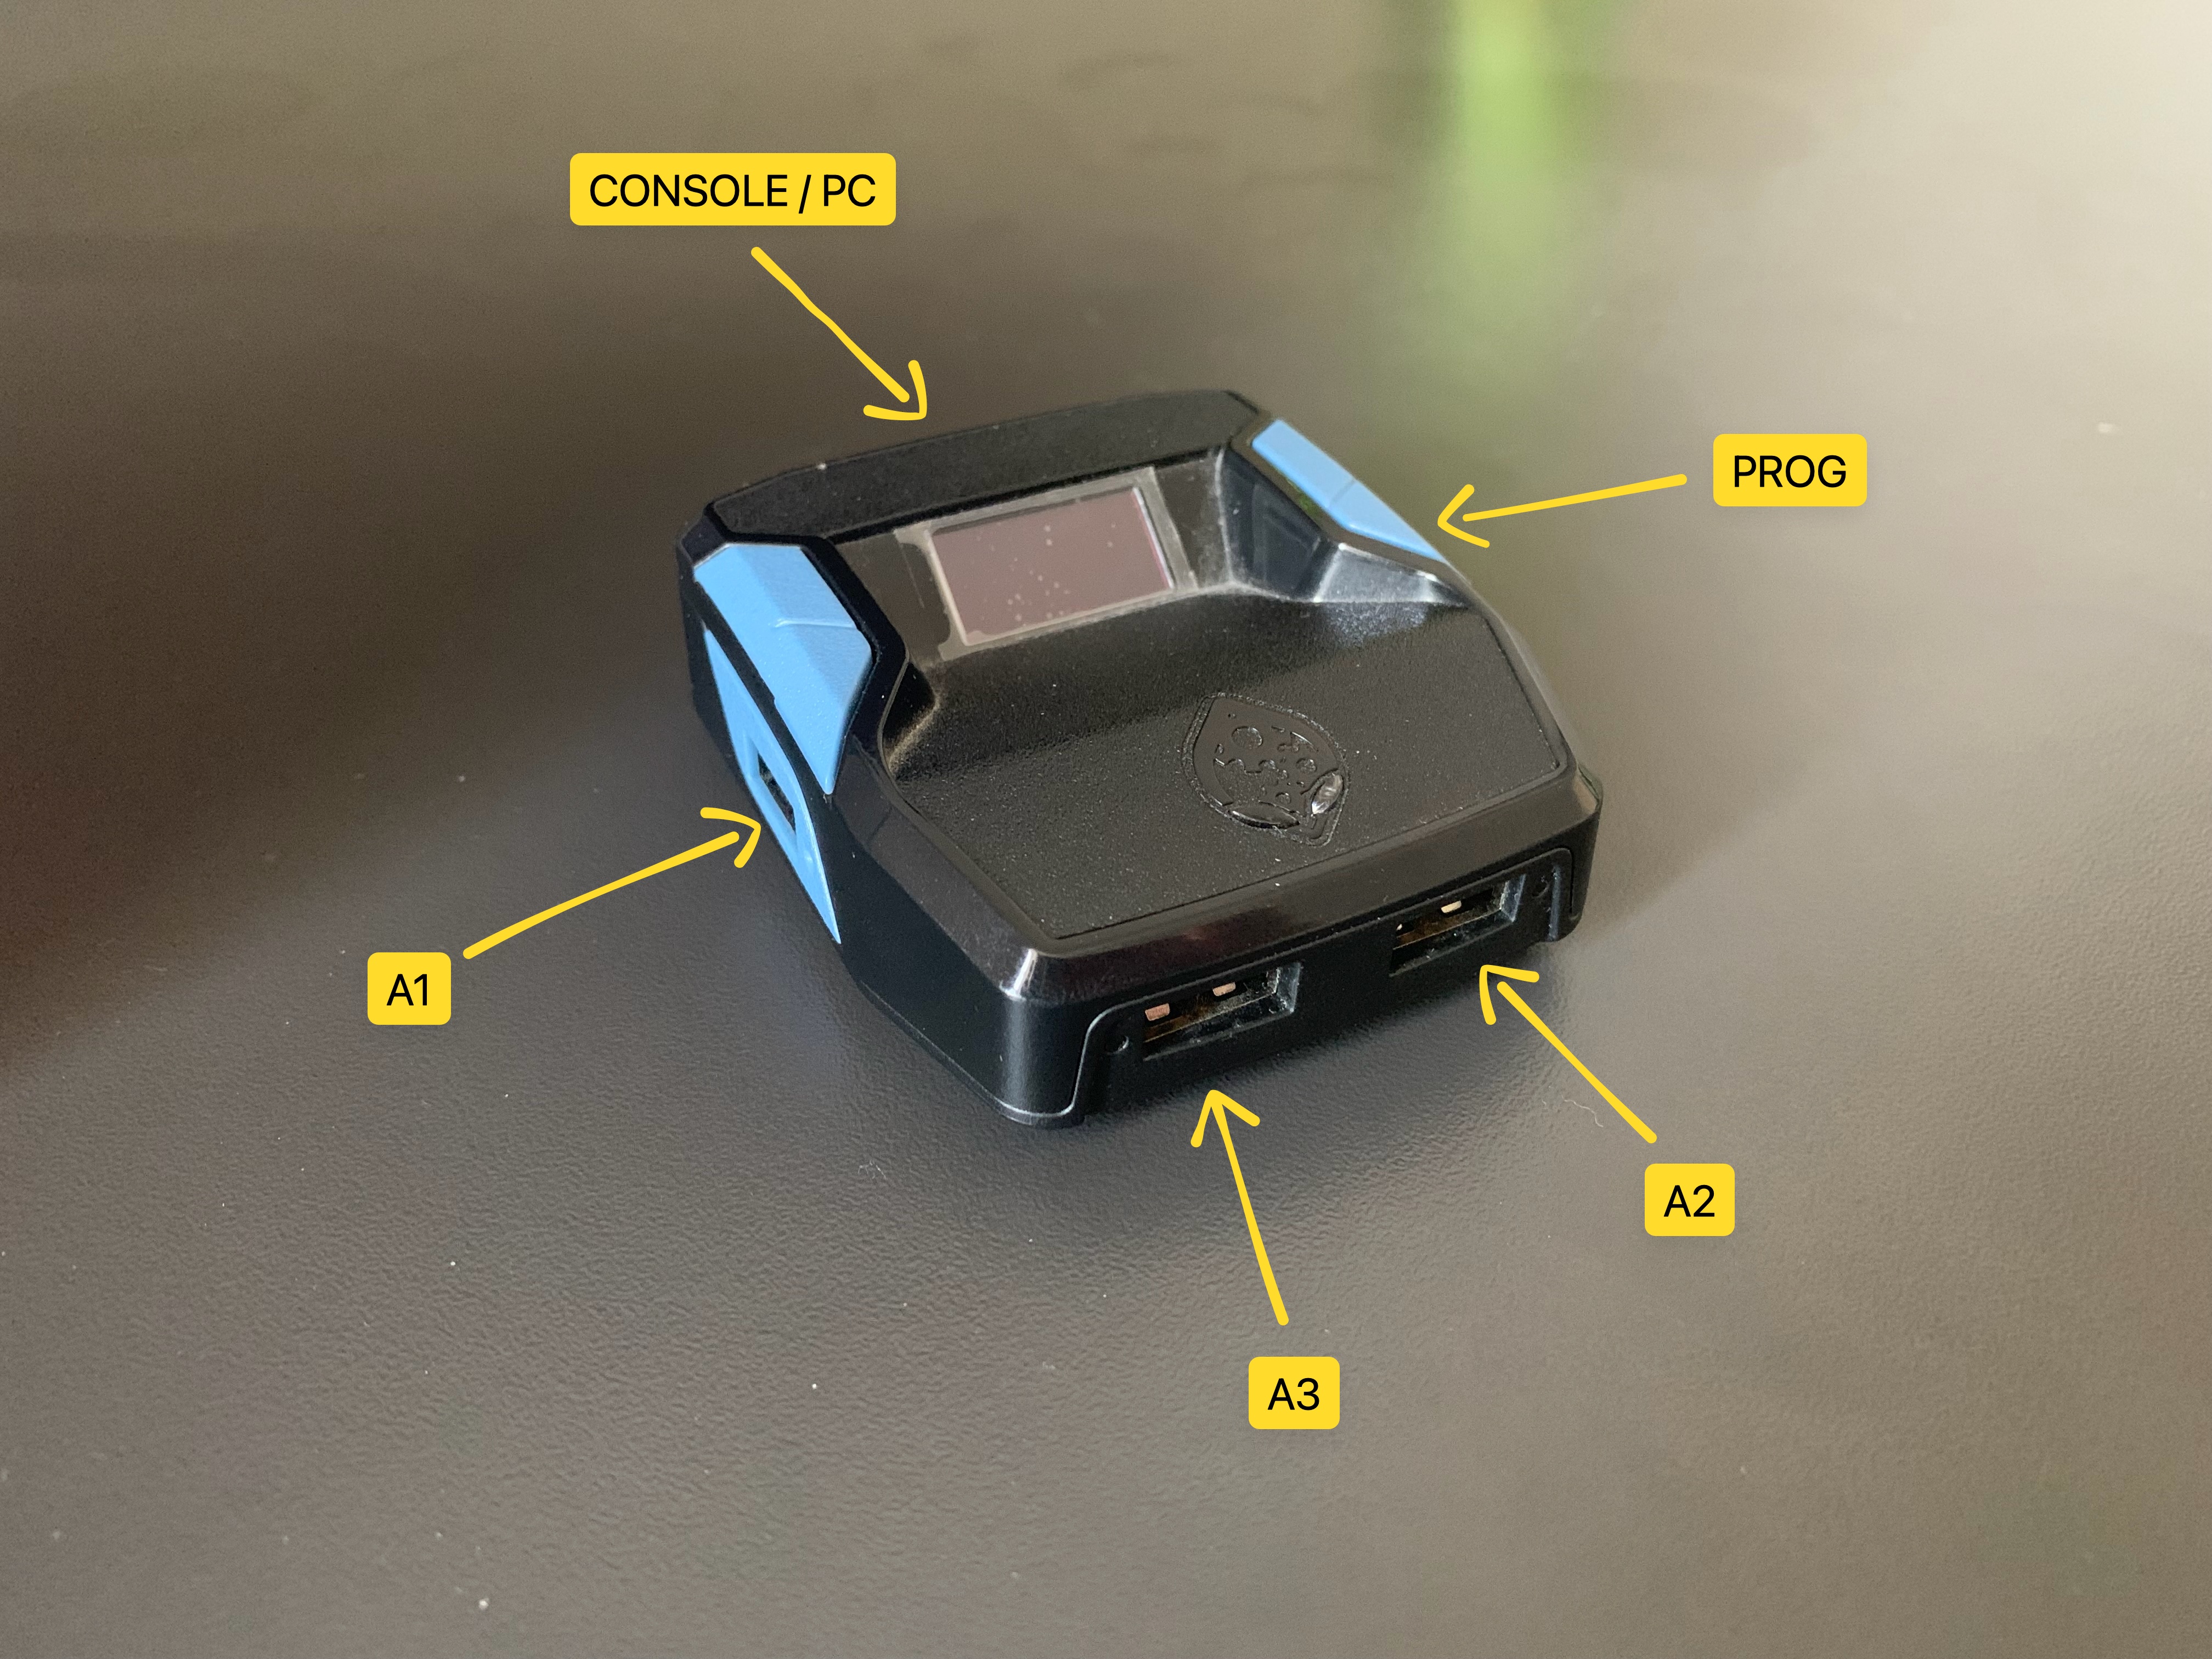
Ports guide
Getting the ports wrong is the #1 reason setups fail. Cronus Zen has five ports that serve completely different purposes.
| Port | Location | Used For | Common Mistake |
|---|---|---|---|
| CONSOLE/PC | Top | Output to console + firmware update | Using this port to connect Zen Studio |
| PROG | Right | Zen Studio connection on PC | Using this port for firmware update |
| A1 | Left | Primary Controller (Default setup); Auth Controller (Crossover setup) | Unplugging A1 in crossover — the Zen loses auth and stops working |
| A3 | Bottom left | Crossover Controller (the controller you actually play with) | Plugging crossover controller into A1 instead of A3 |
| A2 | Bottom right | Mouse & Keyboard; Racing Wheel | Plugging primary controller here |
Simple rule: CONSOLE/PC = console output & firmware. PROG = PC for Zen Studio. A1 = auth/primary controller. A3 = crossover controller.
Step 1: Update firmware
Your Zen must be on the latest firmware before doing anything else.
- Do not plug in the Zen yet
- Flip the Zen over – find the small blue reset button on the back
- Press and hold the blue button, then plug the cable into the CONSOLE/PC port on your Zen and the other end into your PC
- Keep holding until the OLED screen displays "Zen Bootloader" and the RGB LEDs glow purple/blue – then release
- Open Chrome or Edge and go to cronus.support/fw
The firmware web tool works on any OS (Windows, Mac). However, Zen Studio (Step 2) requires Windows 10/11 – keep this in mind if you're on a Mac.
Firefox and Safari will not work for the firmware update tool.
- Click Connect – a popup from firmware.modcentral.ca appears asking to connect. This is expected and legitimate – click Allow
- Select Cronus ZEN → click Connect
Can't see Cronus ZEN in the list? Check three things: (1) USB cable is firmly in the CONSOLE/PC port, not the PROG port; (2) OLED shows Zen Bootloader – if not, unplug and redo the blue button hold; (3) try a different USB cable – cheap cables are often charge-only with no data lines.
- Click "Latest 2.2.XX" – the tool shows "Programming Device, please wait"
- In under 20 seconds the update completes – RGB flashes Red → Green → Blue and the screen shows the Collective Minds Gearhead logo
- Unplug the Zen
Step 2: Install Zen Studio
Windows
- Download latest Zen Studio at cronus.support/downloads
- Run the installer → Next → I Agree → Install
- Two shortcuts appear on your desktop: Zen Studio and ZenLink Configurator
- Plug Zen into the PROG port – this is the left port on the back, NOT the CONSOLE/PC port you used for firmware update
- Open Zen Studio – the script library loads automatically if firmware is up to date
Firmware compatibility error? Go back to Step 1 and run the firmware update again before continuing.
- Go to Device tab → set Output Protocol → Auto
Device Not Connected? Try a different USB cable – most issues are cable-related. If the problem persists, go to Device Panel → click the 🔍 Find Device button.
Had an older version of Zen Studio? Run Tools → Reset Zen Studio first. Note: this erases all backups, settings, and any previously stored script files on your PC – nothing on the Zen device itself is affected.
Mac Apple Silicon
Zen Studio is Windows-only. On Apple Silicon Macs:
- Install Parallels Desktop
- Set up a Windows 11 ARM virtual machine
- In Parallels settings → Hardware → USB → set Cronus Zen to connect to the Windows VM (without this step Parallels will not see the device)
- Launch the Windows VM and follow the Windows steps above
Mac Intel
- Use Boot Camp to install Windows 10/11 on a separate partition
- Restart into Windows and follow the Windows steps above
Register Your Device (Optional)
Registration unlocks access to official Cronus Discord, the GPC Library, Dashboard, Forums, and MarketPlace. Not required to use scripts.
Step 1: Create a Cronus Forums account
Go to cronus.support and create a forum account. Use the same email you'll use for Discord – this links your accounts automatically.
Step 2: Register in Zen Studio
- Open Zen Studio → click Register
- Log in with your Discord account
- After registering: Update Stats button and usage data appear in the right panel
- Copy your serial number from the Dashboard – you'll need it for the next step
Step 3: Join Cronus Discord
- Go to cronus.support/discord
- Complete SMS verification when prompted
- Accept the server rules
- Navigate to the #zen-registration channel
- Enter your serial number to unlock full access to support channels, GPC Library, and community resources
Bought used and it's registered to someone else? Ask the previous owner to unregister at cronus.support/unregister, or contact support directly – ~$10 transfer fee applies.
Step 3 – PS5 setup
Note: This guide covers wired controller setups only. Wired connections have the lowest input lag and are the most reliable way to run scripts on Cronus Zen. Bluetooth and wireless adapter setups are not covered here.
TL;DR: No extra hardware? Use Method 1. Want to skip the bypass forever? Get Besavior P5Mate Pro (Method 2).
Method 1: Standard bypass (D-pad right)
Works with both regular DualSense and DualSense Edge.
- Go to Settings → Accessories → Controller (General) → set Communication Method → Use USB Cable
- Connect the Zen to PS5 via the CONSOLE/PC port on the back of the Zen. If the OLED shows any script icon – tap the right blue button until the Gearhead logo appears. To verify: unplug the CONSOLE/PC cable, then reconnect it once – confirm the Gearhead logo stays on screen. After verification, unplug the cable again so the Cronus Zen is no longer connected to the PS5.
- On PS5, go to Settings → Accessories → General → Advanced Settings – use D-pad to highlight your DualSense in the list. Do not press X / O
- Plug your controller into the A1 port of the Zen with a USB cable.
- While holding D-pad Right, plug the USB cable fully into the Zen's CONSOLE/PC port
- Keep holding D-pad Right for ~5 seconds – bypass is complete when the Zen OLED flashes and returns to the Gearhead logo
- Release D-PAD RIGHT and press O (Circle) to exit the settings menu.
- The bypass is now active.
If it doesn't work: Tap the right blue side button until the Gearhead logo appears (no active script). Unplug everything, wait 10 seconds, and repeat from step 1.
Note: The PS5 bypass is an unofficial method that exploits a timing window in the PS5 authentication flow. Sony may patch it in a future firmware update.
Method 2: Besavior P5Mate Pro (No bypass required)
The P5Mate Pro is a USB dongle that eliminates the bypass requirement entirely.
- Plug the P5Mate Pro into a USB port on your PS5
- Click Home button on P5Mate Pro
- Connect your controller to Zen's A1 port
- Connect Zen to P5Mate Pro via USB
- No bypass needed – works automatically on every boot
Method 3 – Besavior Gamepad (No bypass required)
Same principle as the P5Mate Pro – a dedicated peripheral that removes bypass requirements.
- Connect the Besavior to PS5 wired.
- Do not click Home button on Besavior
- Connect your controller to Zen's A1 port
- Plug Zen into Besavior via OTG cable
- No bypass needed – works automatically on every boot
Method 4 – ZenLink Wi-Fi (No bypass required)
Once configured, no bypass is needed on any boot.
PS5 console settings (do once before setup)
Users and Accounts
- Settings → Users and Accounts → Other → Console Sharing and Offline Play → Enable
System
- Settings → System → Remote Play → Enable Remote Play
- Settings → System → System Software → Console Information → confirm a name is set
Recommended: disable automatic system updates to prevent future compatibility issues. Settings → System → System Software → System Software Update and Settings → Disable Download Update Files Automatically + Disable Install Update Files Automatically
Power Saving
- Settings → System → Power Saving → Set Time Until PS5 Enters Rest Mode → While Playing Games → Don't Put in Rest Mode
- Settings → System → Power Saving → Features Available in Rest Mode → Supply Power to USB Ports → Always
- Settings → System → Power Saving → Features Available in Rest Mode → Enable Stay Connected to the Internet
- Settings → System → Power Saving → Features Available in Rest Mode → Enable Turning on PS5 from Network
- Settings → System → Power Saving → Set Time Until Controllers Turn Off → Don't Turn Off
Controller (General)
- Settings → Accessories → Controller (General) → Vibration Intensity → Strong
- Settings → Accessories → Controller (General) → Trigger Effect Intensity → Strong
- Settings → Accessories → Controller (General) → Communication Method → Use USB Cable
- Settings → Accessories → Controller (General) → Advanced Settings → Turn Off Bluetooth
Note: DualSense Edge settings are found under Profile 1.
DualSense Edge: required profile setup
If using a DualSense Edge, you must create a custom profile or many scripts will break:
- Settings → Accessories → DualSense Edge Wireless Controller → Custom Profiles → Create Custom Profile
- Name it CRONUS → OK
- Select the profile and set:
- Right Stick Sensitivity Curve → Default
- Curve Adjustment → 0
- Deadzone Adjustment → 0%
Initial ZenLink setup (one time only)
- Hold the blue Config button on ZenLink for at least 5 seconds while plugging into your PC – LEDs turn purple (config mode)
- Orange = Wi-Fi connected
- Blinking red = no Wi-Fi configured yet
- Open Chrome or Edge and go to zenlink.local
Firefox, Safari, and Opera do not work
- Select Native PS5 → enter your 2.4GHz Wi-Fi name and password → Save
- Wait for LED to turn orange – this confirms Wi-Fi connection
- Unplug ZenLink from PC
Wi-Fi password tip: Remove special characters (! @ # $ % ^ & *) if you have trouble connecting. Using Ethernet on your PC? Temporarily disconnect the LAN cable during setup – the tool requires Wi-Fi.
Factory Reset (if needed): Hold the reset button (paperclip hole underneath) while plugging into PC until LEDs turn purple then blink red.
Controller setup
- Connect Zen to PS5 via CONSOLE/PC port
- Connect ZenLink to Zen via A1 port – LED turns orange when Wi-Fi connects
- Connect your controller to Zen via A3 port – LED turns green when controller pairs
- Once Zen syncs with PS5, ZenLink LED turns blue – you're ready to play
ZenLink LED reference
| LED | Meaning |
|---|---|
| Purple | Config mode |
| Orange | Connected to Wi-Fi |
| Blinking red | No Wi-Fi configured |
| Blinking blue | Firmware updating – do not unplug |
| Green | Controller paired |
| Blue | Connected to PS5 |
| Red/Blue flashing | Remote Play disconnected |
Troubleshooting
Random disconnections – Enable UPnP in your router settings. Or assign static IPs to ZenLink and PS5 with port forwarding:
- TCP 9295, 9304, 8572
- UDP 9000-65535
No wired headset audio – Settings → Sound → Microphone → Input Device → USB Headset
Console name error – Confirm PS5 has a name set in Settings → System → Console Information.
Step 4: Xbox Series X|S setup
Cronus Zen supports all Xbox Series X and Series S consoles, and all official Xbox Series X|S controllers via USB.
Before starting: Make sure Zen firmware and Zen Studio is updated to latest version.
- Connect Zen to your PC via PROG port → open Zen Studio
- Go to Device panel → set Output Protocol → Xbox One X/S
- Unplug the PROG cable
- Connect Zen to Xbox via CONSOLE/PC port
- Connect your Xbox controller to Zen's A1 port
- That's it – controller pairs automatically
Battery tip: Make sure your controller is fully charged or has fresh batteries. Controllers may not charge while connected through Zen.
Crossover setup (non-Xbox controller on Xbox)
Use this if you want to play with a DualSense, mouse, keyboard, or other non-Xbox device on Xbox.
- Connect your Xbox controller to A1 (required as auth controller – must stay connected)
- Connect your crossover device to A3
- Optional: connect a second crossover device (e.g. mouse for aiming) to A2
An Xbox Series X|S controller must always be connected to A1 when using any crossover device on Xbox.
Supported Controllers
| Controller | USB |
|---|---|
| Xbox Series X|S (1914) | ✅ |
| Xbox Elite Series 2 Core | ✅ |
| Scuf Instinct / Instinct Pro | ✅ |
| Razer Star Wars series | ✅ |
| PowerA Fusion Pro 2/3 | ✅ |
| Razer Wolverine v2 / Chroma | ✅ |
| PDP Afterglow | ✅ |
| Turtle Beach Recon / REACT-R | ✅ |
| Nacon RIG Pro Compact | ✅ |
| Gamesir G7 SE | ✅ |
| Victrix Gambit Dual Core | ✅ |
Not supported: ThrustMaster ESWAP S PRO, ESWAP X PRO, all unlicensed Xbox controllers, all Flight Sticks and H.O.T.A.S. devices.
Step 5: PC Setup
Cronus Zen can be used on PC, but official support is not provided for PC use.
Before playing: Always disconnect the PROG cable from Zen before launching any game. Leaving it connected will cause issues.
PC-only controllers are not supported. Cronus Zen works only with licensed console controllers. PC-designed controllers like the Scuf Envision Pro will not work.
Anti-cheat warning: Some PC games detect and may block or penalize the use of third-party input devices. Check the game's EULA before using Cronus Zen on PC.
Output Protocol
- Connect Zen to PC via PROG port → open Zen Studio
- Go to Device tab → set Output Protocol → Auto
- Plug your controller into Zen's A1 port
- Disconnect the PROG cable
- Launch your game – scripts activate immediately
- Verify via Tools → Device Monitor – press buttons and confirm inputs register
Remote Play
Remote Play lets you use Cronus Zen while streaming your PS5 or Xbox to a PC or laptop.
- Set Output Protocol to Auto in Zen Studio
- Install PS Remote Play or the Xbox app on your PC
- Connect your controller to Zen's A1 port
- Plug Zen into PC via CONSOLE/PC port
- Disconnect the PROG cable
- Launch Remote Play – Zen processes scripts between your controller and the stream
Step 6: Load your first script
GPC Scripts (external files)
For custom scripts downloaded from third-party sources or GPC Library:
- Download the
.gpcscript file to your PC - In Zen Studio → File → Open → navigate to your Downloads folder
- Select the
.gpcfile - Compile script (F7)
- Go to Programmer tab → drag the loaded script into an empty memory slot
- Click Program Device (the flashing play button) – wait for "Success"
GamePacks (built-In)
GamePacks are pre-built mod sets maintained by the Cronus community – no file required, no coding.
- Connect Zen via PROG port → open Zen Studio
- Go to Programmer tab → click Newest to sort by latest
- Browse available GamePacks (Apex Beam, BO6 Beam, etc.)
- Click and drag a GamePack into an empty memory slot
- Click Program Device to save to the Zen
ZenBridge (instant deploy)
ZenBridge is a lightweight Windows tray app that works alongside Tunez to deploy scripts directly to your Cronus Zen – no Compiler tab, no drag-and-drop, no file management.
- Install Zen Studio and update firmware as described in Steps 1–2 above
- Go to usetunez.com and create an account
- Download and install ZenBridge – it runs silently in your Windows system tray
- Connect your Cronus Zen via PROG port as normal
- In Tunez, configure your mods – anti-recoil values, aim assist, rapid fire, BunnyHop, and more – using sliders and checkboxes
- Click Send to Zen Studio – ZenBridge pushes the generated GPC script directly to your Zen in one step. It's compiled immediately.
- Go to Programmer tab → drag the loaded script into an empty memory slot
- Click Program Device (the flashing play button) – wait for "Success"
- Disconnect and play
ZenBridge requires a Windows PC on the same local network as the Zen.
For a full breakdown of scripts, values, and configurations.
Troubleshooting
| Problem | Most Likely Cause | Fix |
|---|---|---|
| Bypass doesn't complete | Active script running on Zen | Press blue side button until screen shows "ZEN" only |
| Touchpad won't turn yellow | Headset plugged in or wrong PS5 settings | Unplug all accessories from PS5, recheck Communication Method |
| Device Not Connected in Zen Studio | Using TOP port instead of PROG | Switch cable to PROG (right side) port |
| Firmware update tool doesn't detect Zen | Wrong browser | Use Chrome or Edge – Firefox and Safari are not supported |
| Controller not lighting up on Xbox | Zen needs reset | Flip Zen, press blue back button once |
| Bought used – registered to someone else | Previous owner's account linked | Contact support at cronus.support (~$10 transfer fee) |
| Xbox controller connects wirelessly | Batteries still in controller | Remove all batteries before connecting to Zen |
| ZenLink error "device in app mode" | Needs factory reset | Hold pin in reset hole + plug in until LED flashes red |
FAQ
Do I have to redo the bypass every time I turn on my PS5?
Yes – Methods 1 must be redone on every PS5 restart. If you want to eliminate the bypass completely, use Method 2 (P5Mate Pro), Method 3 (Besavior), or Method 4 (ZenLink Wi-Fi).
Does Cronus Zen work on Mac?
Zen Studio is Windows-only. Mac users need to run Windows via Parallels Desktop (Apple Silicon) or Boot Camp (Intel Macs). The Cronus Zen device itself is platform-agnostic.
Will I get banned for using Cronus Zen?
Detection risk varies by game. Cronus Zen masks input as a standard controller signal. Games with advanced anti-cheat (Apex Legends, Warzone) have increased detection in 2026. Using human behavior settings and avoiding extreme macro values reduces risk significantly.
What is the difference between a GamePack and a GPC script?
GamePacks install through Zen Studio's GamePacks tab – no file, no coding, limited customization. GPC scripts are .gpc files loaded via the Compiler tab – full control, more setup. Tunez generates and deploys a custom GPC script directly to your Zen via ZenBridge – no Compiler, no drag-and-drop.
Why is my PS5 bypass not working?
Most common causes: (1) an active script is on the Zen – press the blue side button until screen shows "ZEN"; (2) a headset is still plugged into the PS5; (3) Communication Method in PS5 settings is not set to Use USB Cable; (4) controller was not paired wirelessly before the bypass attempt.
Related:
Last updated: March 26, 2026